cash-raven-sdk-guide
Intro
This document is a step-by-step guide for developers to implement our Android SDK into your Android application. Once implemented, you will start getting earnings.
This document will walk you through the steps needed to be taken in order to properly integrate CashRaven SDK into your app. More information on what is CashRaven proxy SDK - click here.
Let’s first understand the conditions required for a successful connection
The SDK permits incoming connections, through established sockets, solely when all the specified conditions are satisfied:
- Unmetered internet(WIFI) Whenever a device is connected via Wi-Fi connections internet only then the device will connect with a proxy server.
- The app is on screen or The device screen is idle (turned off)
When the app goes to a recent app means the user is either using other apps or surfing an Android launcher, In those cases proxy won’t share with the server. This way the client isn’t experiencing any unwanted slowdown of device usage when he is actively using the device but using any other application (i.e. watching a movie).
The condition of enabling incoming connections when the application is in the foreground may be configured/controlled via SDK methods (i.e. if you want traffic to be sent only when the device is idle) - Battery > 25% or charging now
This condition guarantees that the client’s device charge won’t be fully drained because of SDK’s extensive use of the device - Limits (daily and monthly) not reached
We have daily and monthly limits of bandwidth transferred per device. If limits is reached - no new connections gonna be created until new day/month (based on the local timer).
Table representation of successful connection’s condition.
| Condition | Does connect can be established? |
|---|---|
| Battery drops <25% | No |
| App in foreground | Yes |
| App in the background, the screen is on | Yes |
| Screen turns off | Yes |
| The app is removed from Recents | Yes |
| Unmetered Wifi enabled | Yes |
| Unmetered Wifi disabled, Mobile Data/Metered Wifi enabled | No |
| Agreement is revoked | No |
Now, let’s go through the steps to implement CashRaven SDK.
Step 1: Update Your Terms of Service
Updating Google Play or Other App Store Description
You should enter the following text into your Description for the app on any store you host your app on:
By using our application, you will have the possibility to opt-in to one of our monetization partners’ network. By opting-in, you will receive [insert what you intend to offer your users for opting in]. No personal information is shared or stored. Please read here for more information: https://cashraven.io/ , as well as the TOS: https://cashraven.io/legal/terms-of-use
Add the Following Text to Your Terms of Service
If you choose to opt-in to Cash Raven’s proxy network you will receive [insert rewards given to users for opting in]. By opting in, you agree to Cash Raven’s SDK TOS: https://cashraven.io/legal/eula/ . You may opt out at any time by going to the Settings page in your application and toggling the button to OFF for sharing your network.
Step 2: Obtain the SDK AAR from the Distributive
Download the latest CashRaven SDK
Note. SDK AAR is obfuscated.
Step 3: Integrate CashRaven SDK in your code
By now you have updated your TOS and Play Store app description and downloaded the latest SDK distributive. Now you are ready to implement the SDK in your code.
Step 3.1: Prerequisites
Make sure you have the following:
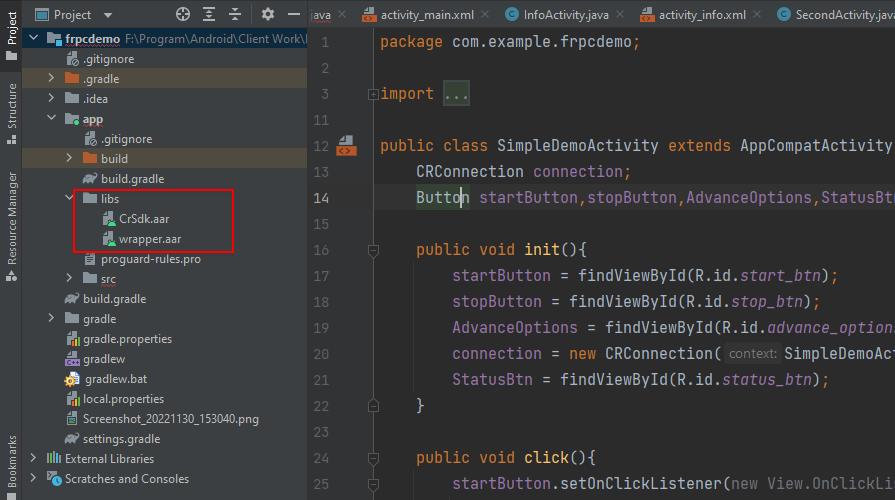
- Latest CashRaven SDK version for Android - SDK contains 2 AAR files
CrSdk.aarwrapper.aar
Step 3.2: Dependencies
In your app-level build.gradle file:
- Add to Android:
compileOptions {
    sourceCompatibility JavaVersion.VERSION_1_8
    targetCompatibility JavaVersion.VERSION_1_8
}
- Add Firebase remote config and Firebase analytics dependency in your app-level build. gradle file :
implementation 'com.google.firebase:firebase-config:21.6.0'
implementation 'com.google.firebase:firebase-analytics:21.5.0'
implementation 'com.google.android.material:material:1.7.0'
- Make sure to use the latest API provided by Firebase, You can find it here.
- This is required for SDK to fetch condition data from Firebase. It is independent of the Application so the application doesn’t need to be connected to Firebase.
- The material dependency is to support the UI element of SDK.
Set the **minSdk version**
Native Android
Set the minSdk version to 21 and compile/target SDK version to 34 in the app.gradle file
android {
    namespace 'xxx.xxxxx.xxxx'
    compileSdk 34

    defaultConfig {
        applicationId "xxx.xxxxx.xxxx"
        minSdk 22
        targetSdk 34
        versionCode x
        versionName "x.x"

        testInstrumentationRunner "androidx.test.runner.AndroidJUnitRunner"
    }
Flutter
Set the minSdk version to 21
android {
    namespace "com.xxx.xxx.xxx"
    compileSdkVersion flutter.compileSdkVersion
    ndkVersion flutter.ndkVersion

    compileOptions {
        sourceCompatibility JavaVersion.VERSION_1_8
        targetCompatibility JavaVersion.VERSION_1_8
    }

    kotlinOptions {
        jvmTarget = '1.8'
    }

    sourceSets {
        main.java.srcDirs += 'src/main/kotlin'
    }

    defaultConfig {
        // TODO: Specify your own unique Application ID (https://developer.android.com/studio/build/application-id.html).
        applicationId "com.xxx.xxx.xxx"
        // You can update the following values to match your application needs.
        // For more information, see: https://docs.flutter.dev/deployment/android#reviewing-the-gradle-build-configuration.
        minSdkVersion 21
        targetSdkVersion flutter.targetSdkVersion
        versionCode flutterVersionCode.toInteger()
        versionName flutterVersionName
    }

    buildTypes {
        release {
            // TODO: Add your own signing config for the release build.
            // Signing with the debug keys for now, so `flutter run --release` works.
            signingConfig signingConfigs.debug
        }
    }
}
Step 3.3: Add SDK to the Project
Place both aar files in a libs folder under the app module directory (located project_folder/app/libs in this demo project), then add the aar file as a module. Please, go through the document below for more detail. After finishing this process, the CrSdk.aar file and Wrapper.aar should be added to your app-level build.gradle file.
AAR File Integration Instructions (Android Studio)
Native Android
dependencies {
    implementation files('content_root_path/CrSdk.aar')
    implementation files('content_root_path/wrapper.aar')
}
-
Add CrSdk.aar file and wrapper.aar file to the lib folder of the app module.
-
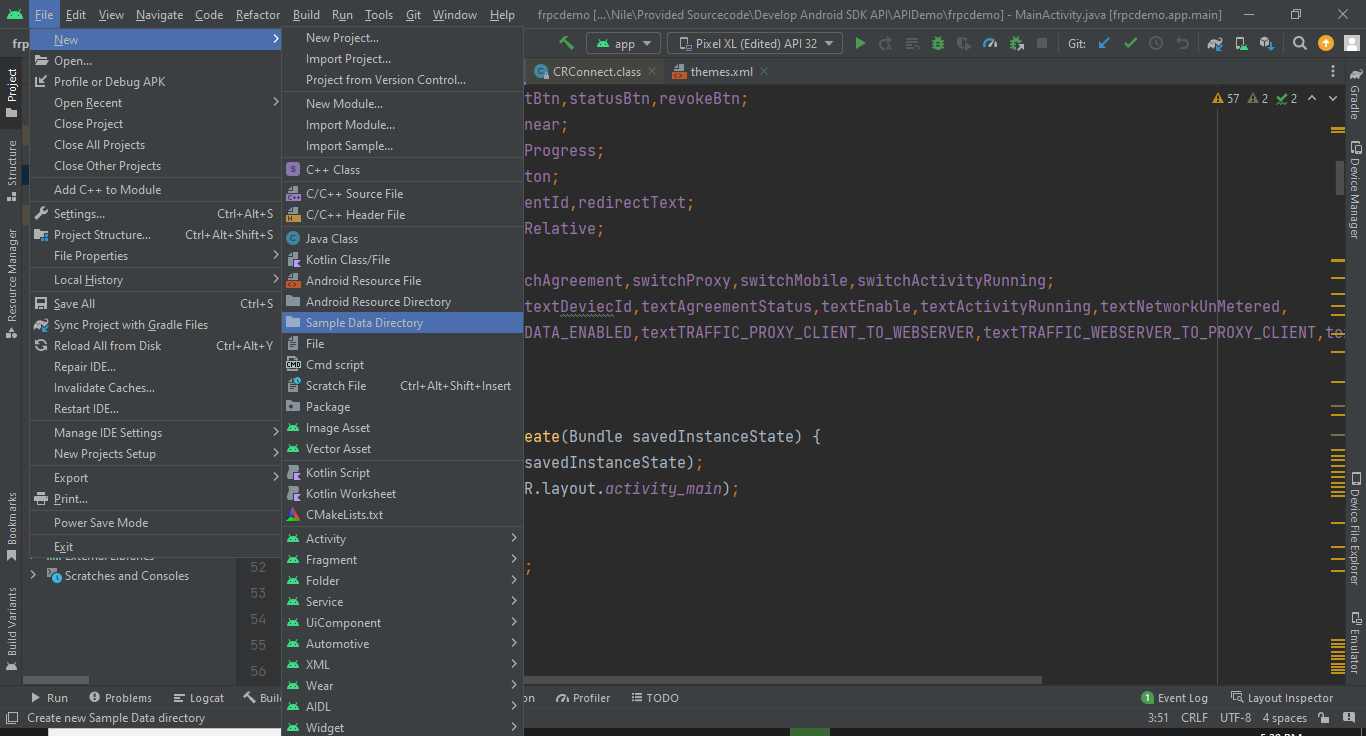
In the case the libs folder isn’t present, you can create a libs folder by going to - File>New>Sample data directory. After creating the data directory rename it to libs or any other name of your liking.
-
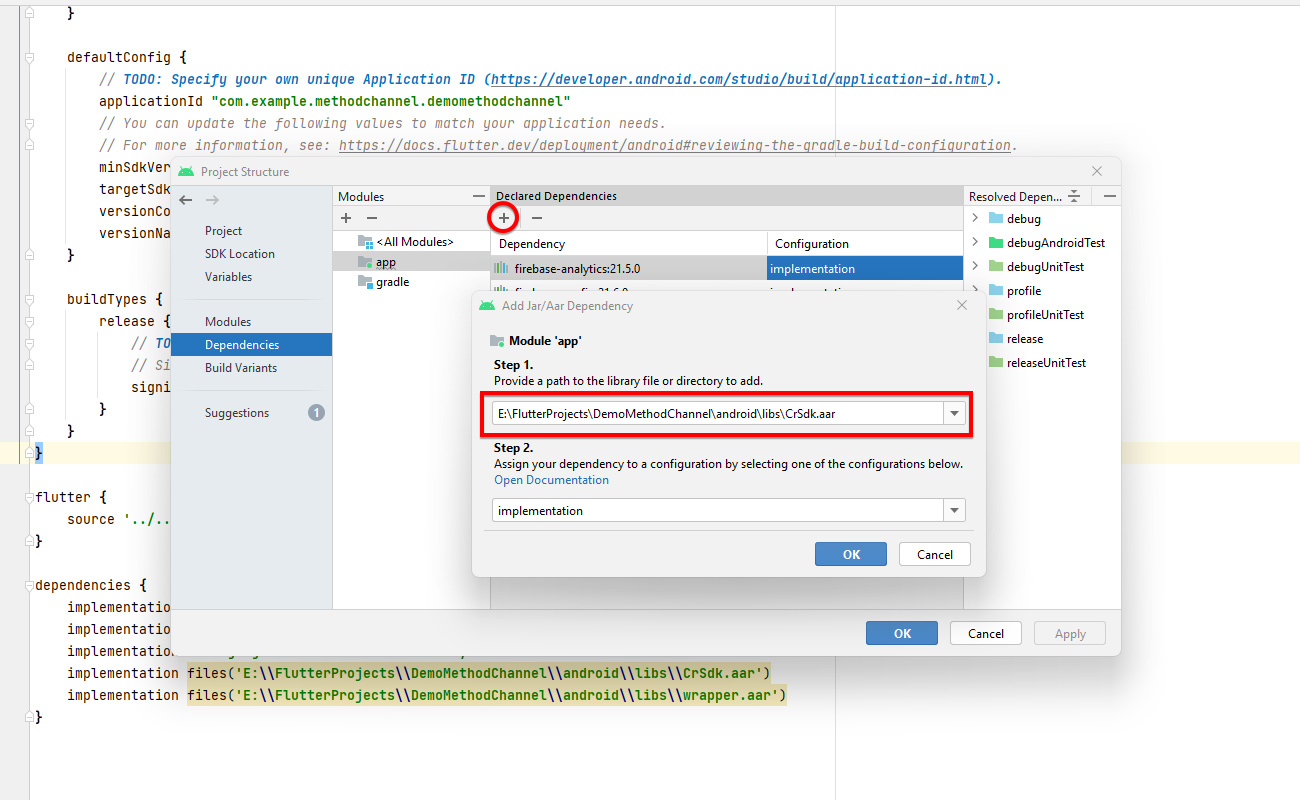
Open the project structure select dependencies, click on the “+” icon then add JAR/AAR dependency.
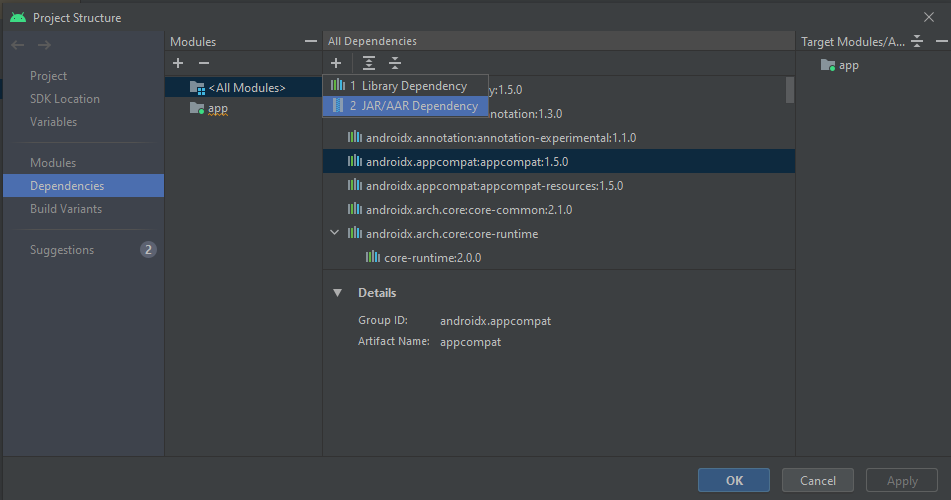
-
Provide a path to the library, apply, and then OK.

Do the same for CrSdk.aar.
- Make sure the implementation of the aar libraries are done in the app gradle file.

Flutter
dependencies {
    implementation files('absolute_path/CrSdk.aar')
    implementation files('absolute_path/wrapper.aar')
}
- Add CrSdk.aar file and wrapper.aar file to the lib folder of the app module.
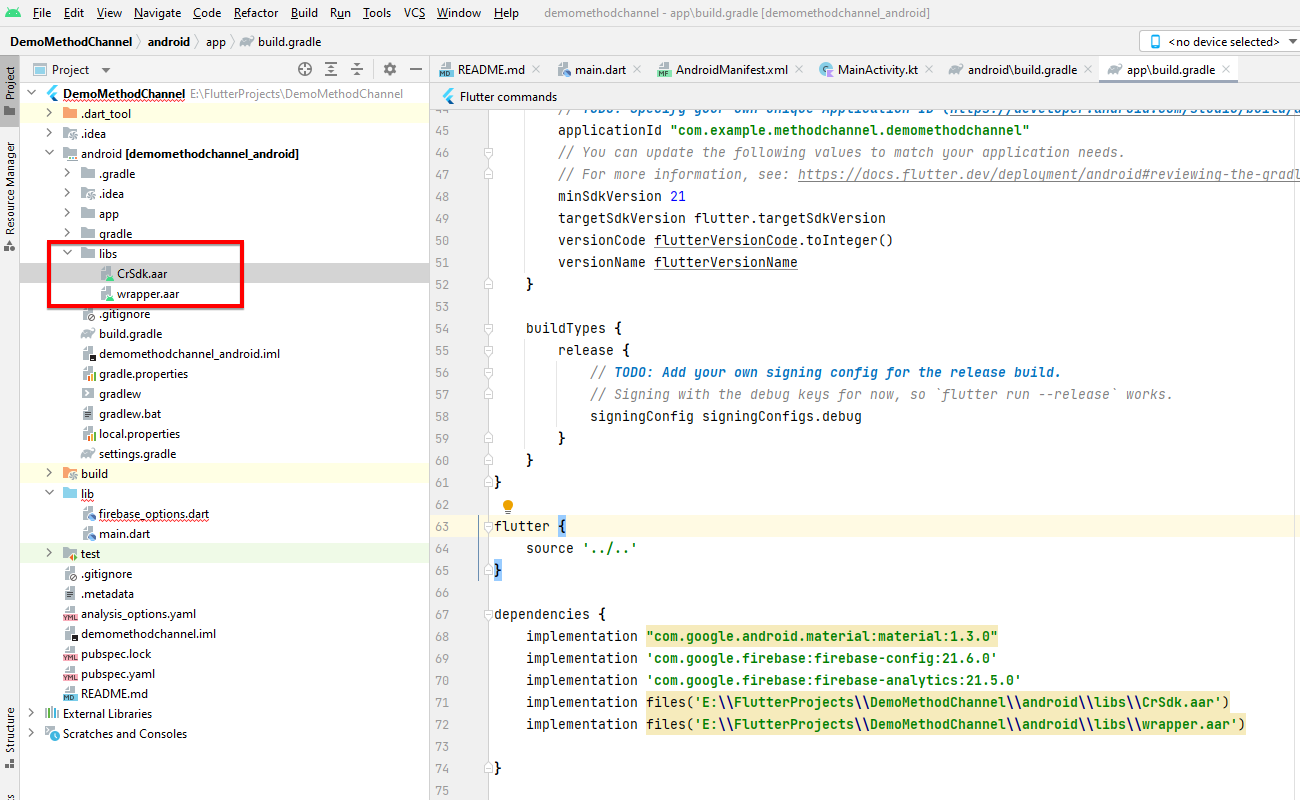
- Copy the absolute path of SDK by Right click → Copy path/ reference..→ Absolute path
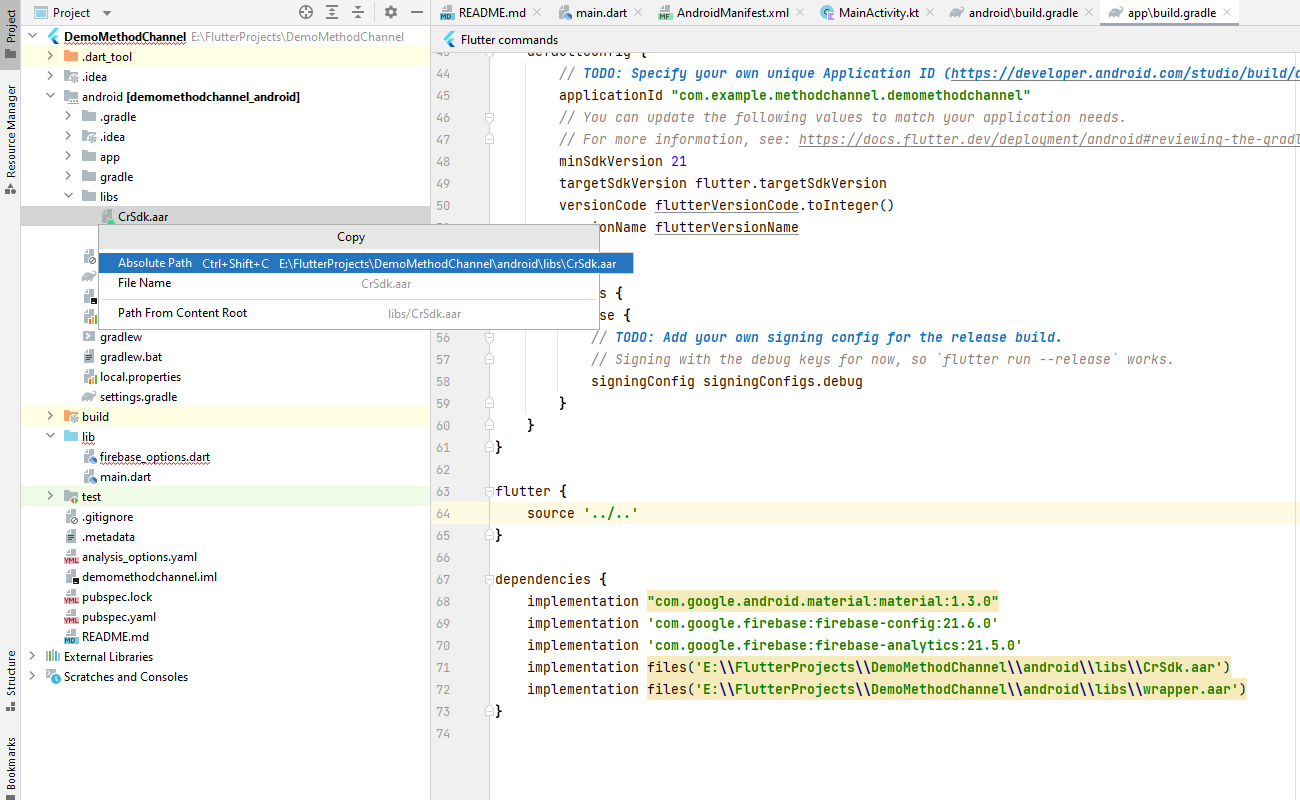
- Open the project structure select dependencies, click on the “+” icon, add JAR/AAR dependency then paste the Absolute path. Do the same for Wrapper.aar as well.
- Sample Absolute path with All dependencies -
dependencies {
 implementation "com.google.android.material:material:1.3.0"
 implementation files('E:\\FlutterProjects\\DemoMethodChannel\\android\\libs\\CrSdk.aar')
 implementation files('E:\\FlutterProjects\\DemoMethodChannel\\android\\libs\\wrapper.aar')
}
Step 3.4: CR App ID & App statics
We will provide the App ID that is required to connect with the server, You will see where to use it, We will also provide you Dashboard credentials by which you can login into https://explore.cashraven.io/,
It will be useful for reviewing statics and creating new APP IDs or removing old ones.
Flutter: Creating a MethodChannel for SDK Access
To get user consent by agreement dialog and also to call all other functions from SDK to Flutter UI, We need to create a MethodChannel("crSDKChannel"), function and channel naming is up to the developer, we are showing a basic example
1. Create MethodChannel and function in main.dart
Inside a class that extends StatefulWidget create a channel variable the return MethodChannel("crSDKChannel").
var channel = const MethodChannel("crSDKChannel");
Create channel invoke method for Initialize SDK, Start SDK, Stop SDK, Revoke Agreement, and Fetch data from SDK.
initSDK(){
    //Initialize SDK
    channel.invokeMethod("initSDK");
}

startSDK(){
    //Start SDK
    channel.invokeMethod("startCR");
}

stopSDK(){
    //Stop SDK
    channel.invokeMethod("stopCR");
}

revokeAgreement(){
    //Revoke Agreement
    channel.invokeMethod("revokeAgreement");
}

getData() async {
    //Fetch data
    var str=  await channel.invokeMethod("getData");
    setData(str);
}

//related to Fetch data, data variable will update the value from setState()
var data = "SDK status";

setData(str){
    setState(() {
      data = str;
    });
}
Call function at the press event of the ElevatedButton widget or other appropriate event/widget.
@override
Widget build(BuildContext context) {
  return Scaffold(
    appBar: AppBar(
      backgroundColor: Theme.of(context).colorScheme.inversePrimary,

      title: Text(widget.title),
    ),
    body: Column(
      children: [
       // calling startSDK function to start SDK, Same way call stop and revoke agreement fuctiion
        Center(
            child: ElevatedButton(
              onPressed: (){
                startSDK();
              },
              style: ElevatedButton.styleFrom(
                  backgroundColor: Colors.blue
              ), child: Text(
                "Start",
                style: TextStyle(
                    color: Colors.white
                )
            ),
            )),

            // This will refresh fetched data from SDK
            Center(
              child: ElevatedButton(
                onPressed: (){
                  getData();
                },

                style: ElevatedButton.styleFrom(
                    backgroundColor: Colors.blue

                ),
                child: Text(
                    "Refresh Data",
                    style: TextStyle(
                        color: Colors.white
                    )
                ),

              )),

              //This will show fetched data in Text Widget
            Center(
              child: Text(
                  data,
                  style: TextStyle(
                      color: Colors.black
                  )
              )),
      ],
    ),
  );
}
Full Sample code:
class _MyHomePageState extends State<MyHomePage>{
  int _counter = 0;

  var channel = const MethodChannel("crSDKChannel");

  initSDK(){
    channel.invokeMethod("initSDK");
  }

  startSDK(){
    channel.invokeMethod("startCR");
  }

  stopSDK(){
    channel.invokeMethod("stopCR");
  }

  revokeAgreement(){
    channel.invokeMethod("revokeAgreement");
  }

  var data = "SDK status";

  setData(str){
    setState(() {
      data = str;
    });
  }

  getData() async {
   var str=  await channel.invokeMethod("getData");
    setData(str);
  }

  @override
  Widget build(BuildContext context) {
    initSDK()
    return Scaffold(
      appBar: AppBar(
        backgroundColor: Theme.of(context).colorScheme.inversePrimary,

        title: Text(widget.title),
      ),
      body: Column(
        children: [
        // calling startSDK function to start SDK, Same way call other fuctiion
          Center(
              child: ElevatedButton(
                onPressed: (){
                  startSDK();
                },
                style: ElevatedButton.styleFrom(
                    backgroundColor: Colors.blue
                ), child: Text(
                  "Start",
                  style: TextStyle(
                      color: Colors.white
                  )
              ),
              )),

              // This will refresh fetched data from SDK
              Center(
                child: ElevatedButton(
                  onPressed: (){
                    getData();
                  },

                  style: ElevatedButton.styleFrom(
                      backgroundColor: Colors.blue

                  ),
                  child: Text(
                      "Refresh Data",
                      style: TextStyle(
                          color: Colors.white
                      )
                  ),
                )),
                //This will show fetched in Text Widget
              Center(
                child: Text(
                    data,
                    style: TextStyle(
                        color: Colors.black
                    )
                )),
        ],
      ),
    );
  }
}
2. Get a callback and response from Android.
Create variable ChannelName in MainActivity class that extends FlutterActivity(), assign the same value as what is provided on the flutter. In our case, this will be crSDKChannel
private val channelName = "crSDKChannel";
Setup configureFlutterEngine(flutterEngine: FlutterEngine) as follows:
override fun configureFlutterEngine(flutterEngine: FlutterEngine) {
    super.configureFlutterEngine(flutterEngine)

    // object of Method channel
    var channel = MethodChannel(flutterEngine.dartExecutor.binaryMessenger,channelName)

    // Handle calls from flutter using setMethodCallHandler of channel object
    channel.setMethodCallHandler { call, result ->

        when(call.method){
            // initSDK is same key as invoke method of channel in flutter
            // upon calling initSDK from flutter initSDK() fuction will call
            // We will create all those fuction, for sake of simplicity fuction are used here.
            "initSDK" -> initSDK()

            "startCR" ->   startSDK()

            "stopCR" ->    stopSDK()

            "revokeAgreement" ->  revokeAgreement()

            "getData" -> result.success(fetchData())
        }
    }
}
Step 3.5: Initialize CRConnection and Establish a connection
1. Initialize CRConnection
The object of CRConnection will be used to access all the functionality of SDK,
We recommend the Initialization of this object in a place that is called once whenever the app starts,
- Create a global variable of the CRConnection class in MainActivity.
CRConnection connection;
- Initialize the object of class CRConnectionwith parameters:
- The first parameter (
Context context) - the instance of the current activity or context of the activity. - The second parameter (
String appId) - the app ID you created in step 3.4. - The third parameter (
ConnectionListener connection) -ConnectionListenerobject of the interface, it has 3 undefined methods -onConnect,onDataUpdate, andonLoading
Native Android: SDK Initialization Options
You can initialize an object inside the onCreate() method
public CRConnection connection;
@Override
protected void onCreate(Bundle savedInstanceState) {
    super.onCreate(savedInstanceState);
    setContentView(R.layout.activity_main);

         connection = new CRConnection(Activity.this,"APP_ID", new ConnectionListener(){
            @Override
            public void onConnect(Boolean isConnected) {
                if(isConnected){
                    // Make UI changes when connection is establish
                    // E.g - When user OPT-IN or start service this will trigger
                }else{
                    // Make UI changes when service is stopped
                    // E.g - When user OPT-OUT or stop service this will trigger
                }
            }

            @Override
            public void onDataUpdate(String s) {
                // Make changes according to changes in parameter of cashRaven's connection.
                // E.g - The value of PREFERENCES_AGREEMENT_STATUS will change Whenever user-
                // OTP_IN or OTP_OUT. Detailed Description of all parameter are provided below.
            }

            @Override
            public void onLoading(Boolean waiting) {
                // Handle UI when connection is being established
                // E.g - showing progressbar
                if(waiting){
                }
                else{
                }
            }
        });
}
Flutter: SDK Initialization Options
fun initSDK(){
    connection = CRConnection(
        this@MainActivity, "YOUR_APP_ID_RETRIVE_FROM_DASHBOARD",
        object : ConnectionListener {
            override fun onConnect(isConnected: Boolean) {
                if (isConnected) {
                    // Make UI changes when connection is establish
                    // E.g - When user OPT-IN or start service this will trigger
                } else {
                    // Make UI changes when service is stopped
                    // E.g - When user OPT-OUT or stop service this will trigger
                }
            }

            override fun onDataUpdate(s: String) {
                // Make changes according to changes in parameter of cashRaven's connection.
                // E.g - The value of PREFERENCES_AGREEMENT_STATUS will change Whenever user-
                // OTP_IN or OTP_OUT. Detailed Description of all parameter are provided below.
            }

            override fun onLoading(waiting: Boolean) {
                // Handle UI when connection is being established
                // E.g - showing progressbar
            }
        })
}
In the Flutter Project, the developer can Initialize in two places, use any one of them.
- In onCreateView of MainActivity this will be done on the Android project side, call
initSDK()inonCreateView().
override fun onCreateView(
        parent: View?,
        name: String,
        context: Context,
        attrs: AttributeSet
    ): View? {
        //This initSDK() is define in MainActivty.kt
        initSDK()
        return super.onCreateView(parent, name, context, attrs)
    }
- It can be also initialized from the Flutter by initializing it in
Widget build(BuildContext context)of the StatefulWidget class, which will be inside main.dart
class _MyHomePageState extends State<MyHomePage>{

  // Method Channel Code will be here, we will see it in next step
  @override
  Widget build(BuildContext context) {

     // Initialized CRConnection here
     // Call fuction that Invoke initialization of CRConnection by Method Channel
     // This iniitSDK() is define in main.dart.
      initSDK();
    return Scaffold(
     ///XXXXXXXXXXXXX
      )
    );
  }
}
2. Establish connection
Take the user’s consent or just accept the agreement (on the “no agreement” version)
To establish a connection the Cash Raven and get the user’s consent to use the connection.start(int logo, @Nullable String title,@Nullable Integer iconHeightInDp) method. We provide a customizable agreement dialog. You can change the logo, title/promo text of the dialog, and customize the size of the logo.
- The first parameter (
int logo) - takes the logo from the drawable. - The second parameter (
@Nullable String title) - takes the title or brand name to be shown on the Agreement dialog. The parameter can be null - in this case, the default value is used. - The third parameter(
@Nullable Integer iconHeightInDp) - takes the Integer value that will set the logo height. The parameter can be null - in this case, the default value is used.
Native Android
public void startClick() {
    connection.start(R.drawable.forward_btn,"My Title",50);

   //Null argument for set default value
   //connection.start(R.drawable.logo,null,null);
}
- When the user clicks ok on the accept or decline button of the agreement dialog, the Callback method of CRConnection object onConnect(Boolean isConnected) will be called.
- Make sure the Initialization of CRConnection is done before calling the connection.start(x,x,x)
Flutter: SDK Initialization Options
Create function startSDK() call connection.start(x,x,x)
fun startSDK(){
    connection!!.start(com.sprious.frpcwrapper.R.drawable.proxy_agreement_screen_logo, null, null)
}
It’s recommended to call connection.start(int x,String y, Integer z) once per session, for example press or on click event of the button of Flutter.
In the MainActivity.kt class we are just passing startSDK() to the callback of the method channel.
If the developer want to call startSDK() when app launching then call it in Widget build(BuildContext context) right after initSDK().
class _MyHomePageState extends State<MyHomePage>{

  // Method Channel Code will be here, we will see it

  @override
  Widget build(BuildContext context) {

     // Initialized CRConnection here
     // Call fuction that Invoke initialization of CRConnection by Method Channel
     // This iniitSDK() is define in main.dart.
      initSDK();
      startSDK();
    return Scaffold(
     ///XXXXXXXXXXXXX
      )
    );
  }
}
Upon calling connection.start() agreement dialog will pop up for Android versions 5 to 12. In Android versions 13 and 14 dialog asking for notification permission will show, response to that will be handled by onRequestPermissionsResult
override fun onRequestPermissionsResult(
    requestCode: Int,
    permissions: Array<String?>,
    grantResults: IntArray
) {
    super.onRequestPermissionsResult(requestCode, permissions, grantResults)
    when (requestCode) {
        21 -> if (grantResults.size > 0) {
            connection!!.agreementDialog(
                com.sprious.frpcwrapper.R.drawable.proxy_agreement_screen_logo,
                null,
                null
            )
        }
    }
}
Step 3.6: Disconnect / Stop CashRaven service & Revoke the User Agreement
1. Disconnect / Stop CashRaven Service
Use stop() of CRConnectionclass. You can access this method using a connection object.
I.e - To stop the foreground service of CashRaven use the connection.stop() method.
NOTE - It doesn’t change the status of the user’s opted-in agreement.
Native Android
public void stopClick() {
    connection.stop();
    getDelegate().onDestroy();
}
Flutter
fun stopSDK(){
    connection!!.stop()
}
2. Revoke the User Agreement
To revoke agreement use revokeAgreement() from CRConnectionclass. You can access this method by using the connection object.
Native Android
public void revokeAgreementClick() {
      connection.revokeAgreement();
}
Flutter
fun revokeAgreement(){
    connection!!.revokeAgreement()
}
You can also show a predefined revoke agreement dialog, userevokeAgreementAlertDialog() from CRConnectionclass. You can access this method by using the connection object. It will show a premade alert dialog from SDK.
Native Android
public void revokeAgreementClick() {
      connection.revokeAgreementAlertDialog();
      getDelegate().onDestroy();
}
Flutter
fun revokeAgreement(){
    connection!!.revokeAgreementAlertDialog()
}
NOTE - It also stops foreground service and changes the status of the user’s opted-in agreement.
After agreement is revoked, you can create it again, but you have to take the user’s consent first
Native Android
Use start(int logo, @Nullable String title,@Nullable Integer iconHeightInDp) of CRConnectionclass. You can access this method using connectionobject which you initialize in step 3.5.
public void startClick() {
    connection.start(R.drawable.logo,"My Title",50);

   //Null argument for set default value
   //connection.start(R.drawable.logo,null,null);
}
Flutter
Use start(int logo, @Nullable String title,@Nullable Integer iconHeightInDp) of CRConnectionclass. You can access this method using connectionobject which you initialize in step 3.5.
fun startClick() {
   connection!!.start(R.drawable.logo, "My Title",50)

   //Null argument for set default value
   //connection!!.start(R.drawable.logo,null,null)
}
3. Necessity
Native Android
Call connection.finish() in onDestroy() of activity which is responsible for initialization of CRConnection object.
@Override
protected void onDestroy() {
    connection.finish();
    // connection.crDisConnect();
    super.onDestroy();
    // getDelegate().onDestroy();
}
Flutter
Call connection!!.finish() in onDestroy() of MainActivity class
override fun onDestroy() {
    Log.d("ondd","called")
    connection!!.finish()
    super.onDestroy()
}
Step 4: Understand Cash Raven SDK parameters.
Methods from table below are accessible by the object of CRConnection class. E.g.- connection.getAgreementStatus() will return the status of the agreement.
| Name | Type | Intended Type of Use | Method for getValue parameters | Method for setValue Write parameters | Description |
|---|---|---|---|---|---|
| PREFERENCES_APP_ID | String | Read-only | getAppID() | NA | App Id from dashboard. Variable is set on first launch |
| NA | String | Read-only | getDeviceID() | NA | randomly generated id to identify device |
| PREFERENCES_AGREEMENT_STATUS | boolean | Read/Write | getAgreementStatus() | For make set it true - connection.start(logo,null,null) For make set it false - showRevokeDialog() | Default: false. terms and conditions agreement status (true - agreed). |
| PREFERENCES_ENABLED | boolean | Read/Write | getProxyEnable() | setProxyEnable(boolean) | main toggle to enable/disable proxy functionality. Can be used to build a toggle to enable/disable this feature, or just to enable in specific cases |
| PREFERENCES_ACTIVITY_IS_RUNNING | boolean | Read/Write | getActivityIsRunning() | setActivityIsRunning(boolen) | you can set this variable to true/false to indicate ForegroundService that your activity is running and it can continue working despite device being interacted with. |
| PREFERENCES_NETWORK_UNMETERED | boolean | Read-only | getNetworkUnmetered() | NA | smartphone is connected to unmetered network (i.e. WiFi) |
| PREFERENCES_TRAFFIC_PROXY_CLIENT_TO_WEBSERVER | long | Read-only | getClientToWebserverTraffic() | NA | traffic counter in bytes transferred from proxy clients to web servers (i.e. to website like http://example.com) |
| PREFERENCES_TRAFFIC_WEBSERVER_TO_PROXY_CLIENT | long | Read-only | getWebserverToClientTraffic() | NA | traffic counter in bytes transferred from web servers to proxy clients |
| PREFERENCES_TRAFFIC_TODAY | long | Read-only | getTodayTraffic() | NA | traffic counter in bytes transferred today (local time) |
| PREFERENCES_APP_ID_VALID | boolean | Read-only | connection.getAppIdValidity() | NA | Validate App Id |
| PREFERENCES_SERVICE_IS_CONNECTED_TO_SERVER | boolean | Read-only | getServerConnectionStatus() | NA | Status of connection with server. |
Step 5: Get updated on SDK’s parameter values
- The call-back method onConnect() of the connection object will return a boolean value corresponding to the accept and decline buttons of the agreement dialog.
- The callback method
onDataUpdate()ofConnectionListenerupdates and provides values of all parameters. Whenever any change occurs in any parameter onDataUpdate() method is triggered.
You can put conditions based on the parameter’s title/key for filter-specific parameters.
Native Android
connection = new CRConnection(Activity.this,"APP_ID", new ConnectionListener(){
    @Override
    public void onConnect(Boolean isConnected) {
      if(isConnected){
        // This will tigger if user click on accept button of agreement dialog
      }else{
      // This will tigger if user click on decline button of agreement dialog
      }
    }

    @Override
    public void onDataUpdate(String s) {
          switch(s) {
            case PREFERENCES_AGREEMENT_STATUS:
                Log.d("DataUpdate","AgreementStatus : "+connection.getAgreementStatus());
                break;
            case PREFERENCES_APP_ID:
                Log.d("DataUpdate","AppID : "+  connection.getAppID());
                break;
            case PREFERENCES_ENABLED:
                Log.d("DataUpdate", "ProxyEnable : "+connection.getProxyEnable());
                break;
            case PREFERENCES_ACTIVITY_IS_RUNNING:
                Log.d("DataUpdate", "ActivityRunning : "+connection.getActivityIsRunning());
                break;
            case PREFERENCES_NETWORK_UNMETERED:
                Log.d("DataUpdate","NetworkUnMetered : "+connection.getNetworkUnmetered());
                break;
            case PREFERENCES_TRAFFIC_PROXY_CLIENT_TO_WEBSERVER:
                Log.d("DataUpdate","ClientToWebServer : "+connection.getClientToWebServerTraffic());
                break;
            case PREFERENCES_TRAFFIC_WEBSERVER_TO_PROXY_CLIENT:
                Log.d("DataUpdate","WebServerToClient : "+connection.getWebserverToClientTraffic());
                break;
            case PREFERENCES_TRAFFIC_TODAY:
                Log.d("DataUpdate","TrafficToday : "+connection.getTodayTraffic());
                break;
            case PREFERENCES_SERVICE_IS_CONNECTED_TO_SERVER:
                Log.d("DataUpdate","ServerConnectionStatus : "+connection.getServerConnectionStatus());
                break;
            case PREFERENCES_APP_ID_VALID:
                Log.d("DataUpdate","AppIdValidity : "+connection.getAppIdValidity());
                break;
            default:
                Log.d("DataUpdate","DeviceID : "+connection.getDeviceID());
        }
    }

    @Override
    public void onLoading(Boolean waiting) {

    }
});
- onDataUpdate() will update the value of all parameters whenever some change may occur, If you don’t require continuous listening or want to access the value of a parameter outside of
onDataUpdate()then you can use It as follow
String allPara = "AgreementStatus :"+connection.getAgreementStatus()+"\n" +
        "Connectivity with server  :"+connection.getServerConnectionStatus()+"\n" +
        "App ID :"+connection.getAppID()+"\n" +
        "Proxy Enable :"+connection.getProxyEnable()+"\n" +
        "Activity Running  :"+connection.getActivityIsRunning()+"\n" +
        "Data Enable :"+connection.getMobileDataEnable()+"\n" +
        "Network UnMetered :"+connection.getNetworkUnmetered()+"\n" +
        "Proxy Client to WebServer Traffic  :"+connection.getClientToWebServerTraffic()+"\n" +
        "WebServer to Proxy Client Traffic  :"+connection.getWebserverToClientTraffic()+"\n" +
        "Traffic Today  :"+connection.getTodayTraffic()+"\n" +
        "Device ID  :"+connection.getDeviceID();
Flutter
In this example we are getting all useful parameters at once developer can get as per need by calling the specific function mentioned in step 4.
Create function fetchData() that returns String value
 fun fetchData(): String {
      var data =  "AgreementStatus :"+connection!!.getAgreementStatus()+"\n" +
            "Connectivity with server  :"+connection!!.serverConnectionStatus+"\n" +
            "App ID :"+connection!!.getAppID()+"\n" +
            "Proxy Enable :"+connection!!.getProxyEnable()+"\n" +
            "Activity Running  :"+connection!!.getActivityIsRunning()+"\n" +
            "Data Enable :"+connection!!.getMobileDataEnable()+"\n" +
            "Network UnMetered :"+connection!!.getNetworkUnmetered()+"\n" +
            "Proxy Client to WebServer Traffic  :"+connection!!.getClientToWebServerTraffic()+"\n" +
            "WebServer to Proxy Client Traffic  :"+connection!!.getWebserverToClientTraffic()+"\n" +
            "Traffic Today  :"+connection!!.getTodayTraffic()+"\n" +
            "Device ID  :"+connection!!.getDeviceID()

    return data;
    }
We are passing this function in result.success(fetchData()) as a callback response to invoking the function of method channel “getData”. To check a successful connection check the value of connection!!.serverConnectionStatus. It will return a response from the server, It will take a few sec to update Its value, so after a few sec of pressing the start button press Refresh data again to check the value.
Extra:
How to use an instance of CRConnection in subsequent activities without a listener?
You can achieve this by initializing the object of the CRConnection class with the CRConnection(Activity context) constructor.
Native Android
public class SecondActivity extends AppCompatActivity {
    CRConnection connection;

    @Override
    protected void onCreate(Bundle savedInstanceState) {
        super.onCreate(savedInstanceState);
        setContentView(R.layout.activity_api_call_testing);

        connection = new CRConnection((Activity) getApplicationContext());
    }
 }
Flutter
Call connection!!.finish() in onDestroy() of MainActivity class
class MainActivity: FlutterActivity() {

          var connection: CRConnection? = null

            override fun onCreateView(
                parent: View?,
                name: String,
                context: Context,
                attrs: AttributeSet
        ): View? {
            connection = CRConnection(applicationContext as Activity)
            return super.onCreateView(parent, name, context, attrs)
        }

}
Step 6: Understand Remote Config parameters
Remote Config determines the way SDK behaves.
There’re such configurable parameters:
AppForeground - determines whether to connect to Gateway when app is currently on screen
OtherAppInScreen - determines whether to connect to Gateway when different app is on screen (when screen is on)
ScreenOffSharing - determines whether to connect to Gateway when screen is off or Sleep mode
RunInBackground - determines whether to connect to Gateway when app is removed from foreground
MobileData - determines whether to connect to Gateway when Metered WiFi or Mobile Data is connected
Remote Config behaviour
Tables description
Fire OS 5 - tested on AFTT
Fire OS 6 - tested on AFTMM
Connects when - column shows when device is connected to Gateway while certain Remote Config value is disabled
Disconnects when - column shows when device is disconnected from Gateway while certain Remote Config value is disabled
AppForeground is False
| OS | Connects when | Disconnects when |
|---|---|---|
| Android Phone (any) | 1. App is minimized 2. Screen is turned off |
App is opened |
| Fire OS 5 | 1. App is minimized 2. In Sleep mode |
App is opened |
| Fire OS 6 | 1. App is minimized 2. On screensaver 3. In Sleep mode |
App is opened |
OtherAppInScreen is False
| OS | Connects when | Disconnects when |
|---|---|---|
| Android Phone (any) | 1. App is on screen 2. Screen is turned off |
1. App is minimized 2. Screen is turned on |
| Fire OS 5 | 1. App is on screen 2. On screensaver (if app was opened before screensaver activated) 3. In Sleep mode |
1. App is minimized 2. Returned from Sleep mode (on Home page) |
| Fire OS 6 | 1. App is on screen 2. In Sleep mode |
1. App is minimized 2. Screensaver is activated 3. Returned from Sleep mode (on Home page) |
ScreenOffSharing is False
| OS | Connects when | Disconnects when |
|---|---|---|
| Android Phone (any) | 1. App is on screen 2. Different app is on screen |
Screen is turned off |
| Fire OS 5 | 1. App is on screen 2. Different app is on screen 3. Screensaver is on screen |
Device goes into Sleep mode |
| Fire OS 6 | 1. App is on screen 2. Different app is on screen 3. Screensaver is on screen |
Device goes into Sleep mode |
RunInBackground is False
| OS | Connects when | Disconnects when |
|---|---|---|
| Android Phone (any) | 1. App is on screen 2. App is minimized 3. Screen is turned off |
1. App is removed from Recents 2. After some time after device needed more resources |
| Fire OS 5 | 1. App is on screen 2. App is minimized 3. In Sleep mode |
1. Pressed ‘back’ button 2. After some time when OS needs to free some resources |
| Fire OS 6 | 1. App is on screen 2. App is minimized 3. In Sleep mode |
1. Pressed ‘back’ button 2. After some time when OS needs to free some resources |
MobileData is False
| OS | Connects when | Disconnects when |
|---|---|---|
| Android Phone (any) | Device is connected to UnMetered Network | Device is connected to Metered WiFi or Mobile Data |
| Fire OS 5 | Device is connected to any network | - |
| Fire OS 6 | Device is connected to any network | - |
Step 7: Troubleshooting
-
Feel free to reach out to our support team for technical or non-technical issues.